Glass Line
February / March, 1999 - Vol. 12 No. 5
<ONLINE EDITION>
BULLSEYE MARBLES
by Drew Fritts
 |
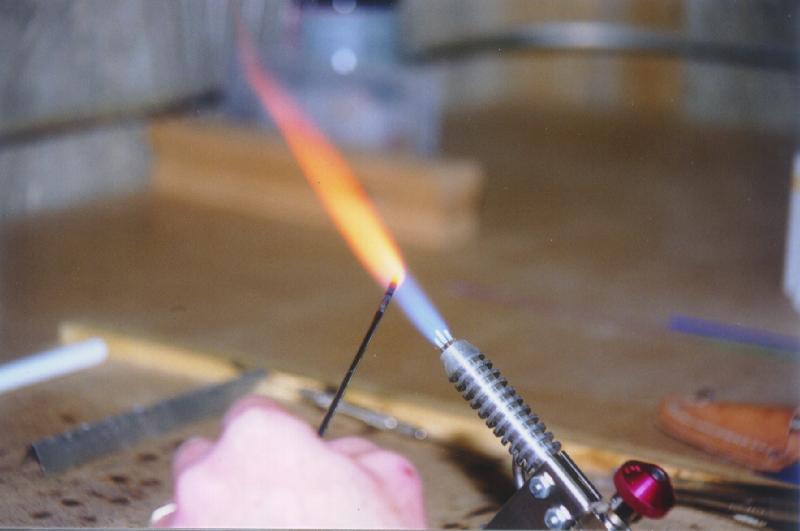
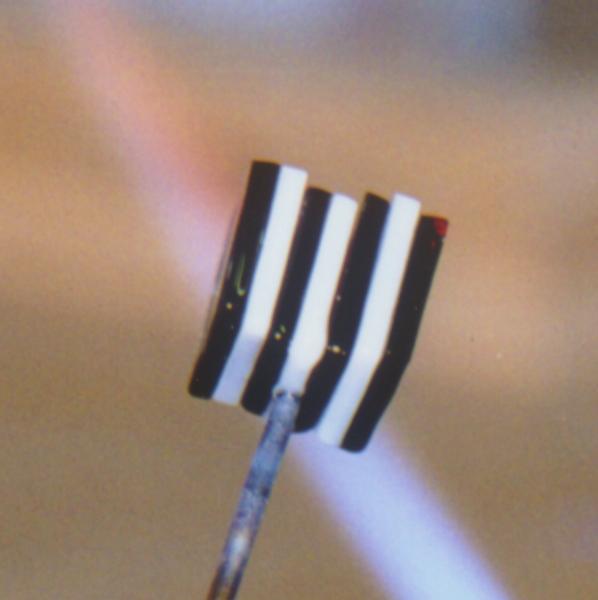
Figure 1
Steel Punty
|
Most lampworkers that use rods of Moretti, Pyrex or Northstar, have at one time or another wondered, "Could I use sheet glass in the torch?" Lampworkers that also do fusing are especially prone to wonder this. They typically have boxes and boxes of tiny little scraps of sheet glass that they just can’t bear to throw out because, "they might come in handy some day!" Well, my curiosity got the better of me and I tried to use sheet glass in the torch to make marbles. I quickly realized that, without coming up with some new techniques, it would be nothing less than frustrating. Therefore, my premise in researching this article was to explore techniques necessary to handle small pieces of any sheet glass in the flame. While conducting my research I documented the effects of the flame when working Bullseye glass specifically, at high temperature, for an extended period of time. This article is not intended to be a lesson in marble making. However, any experienced lampworker with a set of marble molds, should be able to use the information presented here to make some very nice marbles out of their scraps of sheet glass.
Top
FUSIBLE COMPATIBLE GLASS
Making a marble is essentially a fusing project in which you happen to be shaping the end product.
Therefore, the first problem that arises, as in any fusing project,
is finding the colors you want in glass that is fusible and
 |
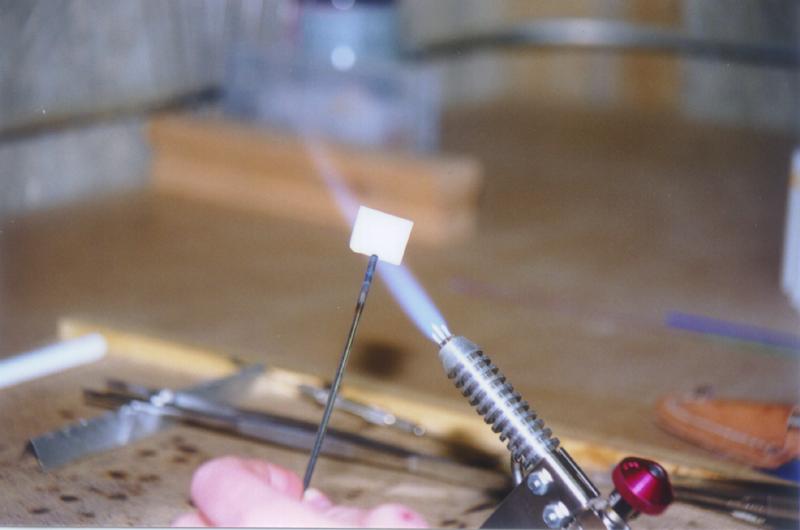
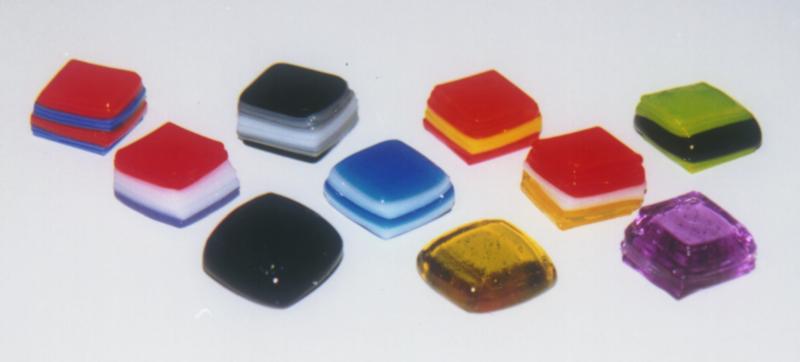
Figure 2
The Lollipop
|
compatible. Obviously, if you’re working from your scrap pile, you’ll want to do some compatibility testing before you start making marbles. However, since that process is beyond the scope of this article, I chose to use Bullseye "tested compatible" glass. I happen to have Bullseye Glass Company’s Master Kilnforming Sample Set, and I used it to identify the many pieces of their "Tested Compatible" colors that I have. Therefore, during my testing, I could record information about how specific glass colors react in the flame. I must point out there are other glass manufacturers that produce sheet glass that is compatible with the Bullseye "tested compatible" line, and that they can be intermixed. In addition, marbles can be made using these techniques, from sheet glass that is not "tested compatible", and without performing any compatibility tests, as long as it is not mixed with any other glass. Some very interesting marbles can be made from a single sheet of multicolored glass.
Top
HOLDING THE GLASS
The second problem that arises when trying to use sheet glass in the torch is how to hold it. My first
thought was to cut long, 1/4 inch wide strips that would simulate rods. This didn’t work for me
 |
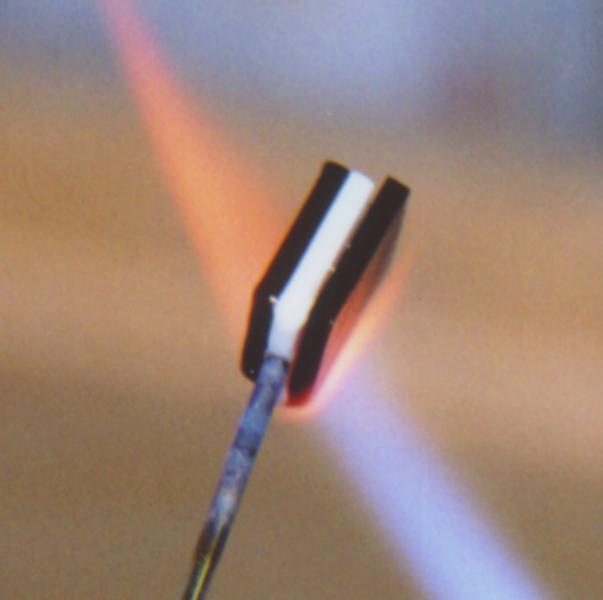
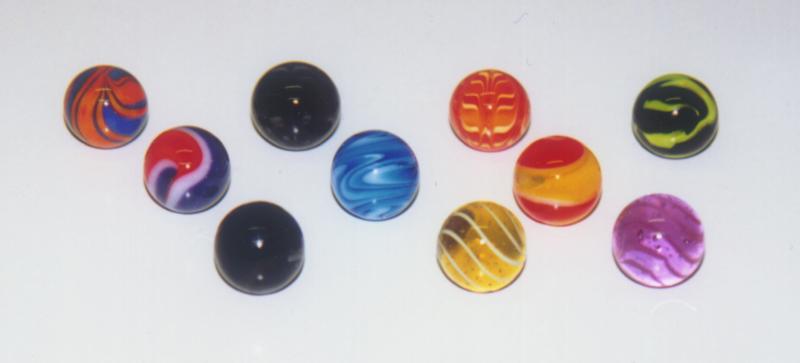
Figure 3
Adding Layers
|
because, when making a marble, I have to be able to spin the punty between my fingers. Although I could turn it between my fingers, the rotation was extremely uneven and there was a risk of cutting my fingers on the sharp edges of the strip of glass. I also had a problem with thermal shock using strips. When I would use a strip in the flame, set it aside, and then put it back in the flame later, up to an inch and a half of the end would crack and fall off. This is especially disconcerting if the end that falls off also happens to be holding the hot marble at the time.
My next thought was that I could pull my own rods. After giving this a lot of careful consideration I decided that, although it is definitely possible, it’s not really practical for most people - especially if they’re just working from their scrap pile.
I then thought about ordering a supply of "Tested Compatible" clear rods to use as punties. This would certainly solve the problem of spinning the punty between my fingers. However, I came up with what I consider to be a better idea. I borrowed an idea from glass blowing: the steel punty. I pulled out some 9 inch long, 1/8 inch diameter stainless steel bead
 |
Figure 4
The Gather
|
mandrels and started using them as punties. If you don’t happen to have any bead mandrels lying around, you can pick up stainless steel welding rods at your local welding supply company and make your own. They come in several diameters and they’re very inexpensive.
The first thing I tried was putting a very small gather of glass on the end of the punty and then attaching that to my main gather. This attempt failed, again due to thermal shock. Every time I would let the punty joint cool even slightly while I worked on the rest of the gather, it would crack and the gather would fall off. I tried bigger and smaller gathers on the punty before I attached it to my main gather, but neither one worked. I finally decided that the steel was cooling off too quickly and causing the small gather to break, due to either thermal shock or the difference in the COE between the glass and steel.
I decided I needed a smaller surface area of the steel touching the glass. I theorized that a smaller surface area would remain hot enough to stay attached because of the radiated heat from the gather. Therefore, I took my bead mandrels to the bench grinder and rounded the ends. I then experimented with attaching just the tip of the rounded punty directly to my main gather. To my surprise, this approach works very well, as long as I am working with a mass such as a gather or a marble. It doesn’t work well when the radiated heat from the glass is insufficient to keep the end of the punty hot, such as when pulling latticino. As the latticino gets longer, the thickness of the glass is reduced and it cools too rapidly. As soon as the glass is no longer radiating enough heat, either the punty pops off, or the end of the latticino breaks off. NOTE: I also discovered that the stainless steel punties work extremely well for working other soft glasses such as Moretti, but these methods don’t work at all when using hard glass such as Pyrex.
Top
GATHERING THE GLASS
To make a marble I start with an initial "gather." The gather is simply the amount of glass I need to form the base marble. The surface stripes or patterns are added after the gather is melted together. Initial gathers are formed in one of two ways: I make blanks by pre-fusing squares of sheet glass together; or I build up the gather in the flame from layers of sheet glass.
Top
The Flame Method: To build up an initial gather in the flame, I preheat small pieces of Bullseye fusible glass on a hotplate. Typically these pieces are between 1/2 inch
 |
Figure 5
Fused Blanks
|
and 1 inch square, depending on the size of marble I plan to make (i.e. 7 pieces of 1/8 inch glass that measure 7/8 inch square will make a marble that is just slightly over 1 inch). I heat the end of the stainless steel punty rod directly in the flame until it is glowing (Figure 1 - Steel Punty). Meanwhile, I preheat the tips of my 10 inch stainless steel tweezers in the back flame. I pick up one of the pieces of glass with my preheated tweezers and heat one of its edges. I then push the glowing tip of the punty into the heated edge and remove it from the flame. When it has cooled enough to let go with the tweezers it looks like a lollipop. (Figure 2 - The Lollipop) I then put the lollipop back into the cooler part of the flame and pick up the other pieces of glass, one at a time with my preheated tweezers, and stick them onto the lollipop so that the layers are evenly distributed above and below the first piece (Figure 3 - Adding Layers). In this way I end up with a cube of glass with my punty rod sticking out of the middle of one side. This is my initial gather. (Figure 4 - The Gather)
Top
NOTES:
- I found that if I don’t preheat my tweezers before picking up a small piece of sheet glass from the hotplate, the piece will thermal shock and break, starting where the tweezers are holding it.
- To add the pieces to the initial lollipop I just heat one edge of the piece held in the tweezers and one edge of the piece attached to the punty. I usually heat the edge to which the punty is attached just to make sure the punty joint stays warm. I then attach them by the heated edges and move on to the next piece. In this way I can get my gather together quickly. Once the entire block is stuck to the punty, I melt them all together and make the marble.
- In Bullseye glass, as with all brands of glass, certain formulas, and therefore certain colors, are more susceptible to scorching. Be especially careful with the edges of any cut sheet glass. Until those thin, sharp edges melt into the gather, they are more likely to scorch or boil because they heat up more quickly than the rest of the glass.
Top
The Fused Method: To make pre-fused blanks, instead of taking the time to gather in the flame, I cut squares of glass and stack them to make cubes with different patterns. They are stacked directly on a kiln shelf that has had kiln wash applied. I fuse the blanks in the kiln at 1300 degrees Fahrenheit and then anneal them to reduce the risk of thermal shock when I later take them into the flame. After annealing I clean the blanks to ensure that there is absolutely no kiln wash left on the bottom. (Figure 5 - Fused Blanks)
To use the blanks, I put them in the kiln on a fiber blanket. This keeps them off of the fire brick just in case something were to go wrong with
 |
Figure 6
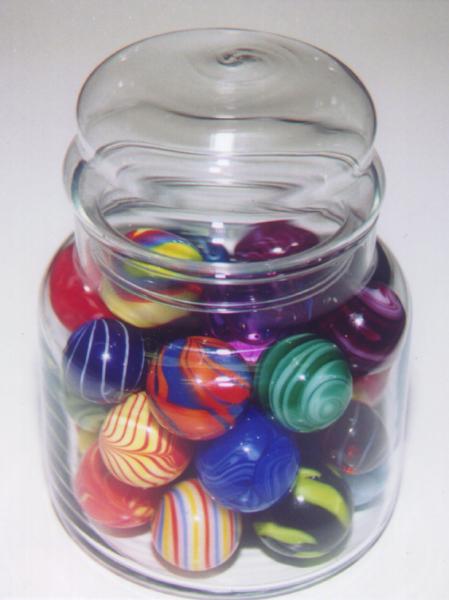
Finished Marbles
|
my controller. It also makes a nice soft surface to set the completed marbles on after I’ve made them. I slowly bring the temperature up (about 300 degrees per hour) to 900 degrees Fahrenheit and hold it there. Wearing my protective gloves, I first preheat my 10 inch stainless steel tweezers in the back flame. I then open the kiln, reach in and pick up the blank I want and take it directly into the backflame after closing the kiln. I take off my glove and pick up a stainless steel punty rod. I heat the end of the punty rod directly in the flame until it glows. I then push the glowing tip of the punty into the heated edge of the blank. I let go of the blank with the tweezers and bring it up into the main flame. I now have my initial gather and am ready to make a marble (after I take off my other glove). (Figure 6 - Finished Marbles)
Top
NOTES:
- This method uses much less gas and oxygen but takes more actual time because of the fusing / annealing cycle, the cleaning off of the kiln wash, and the length of time it takes to get the blanks back up to temperature.
- One advantage of this method is that it is much easier to "fuse" out air bubbles that might otherwise get trapped between layers when building the gather in the flame.
- Another advantage is that there is less chance of scorching or boiling the edges of the individual sheets because they have all rounded and started melting together.
- Be sure to clean all of your cut pieces of glass before fusing them (or putting them in the flame for that matter) especially if you use a lubricant on your glass cutter. Some lubricants can create a scum on the glass that will not burn off. The easiest way I have found to clean the glass is to drop them in a butter tub filled with rubbing alcohol. As I cut the squares I simply drop them in the tub. When I’m all done cutting, I drain the tub into another container that seals and wipe the pieces dry with a towel.
Top
HANDLING TECHNIQUES
- Remember that the punty is only pressed into the glass until the rounded end is embedded about 1/16 inch - no deeper. This holds well and makes it easier to remove later. If the punty is inserted deeper than that, it
 |
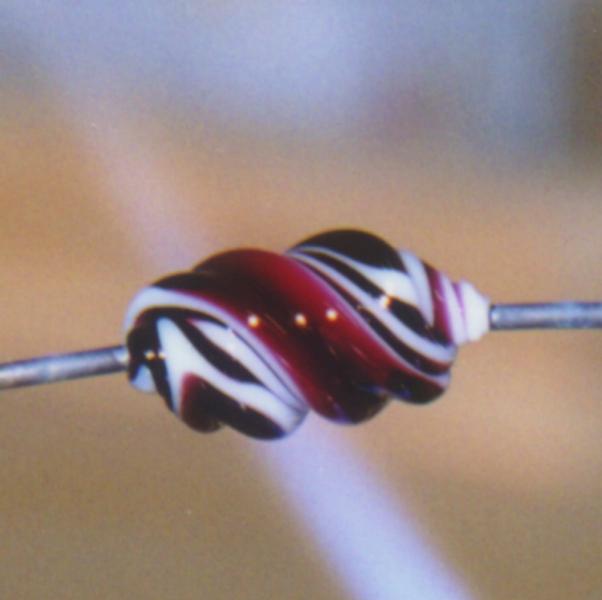
Figure 7
Twisting
|
doesn’t hold any better.
- Transferring from one punty to another: The point where the new punty is to be placed doesn’t have to be heated as much as when transferring to a glass punty. In fact, I usually hold the marble out of the flame, heat the punty to red hot and just press it into the marble. The heat in the punty is enough to make the bond. I can then immediately remove my other punty. I don’t have to wait nearly as long for the new one to solidify enough to support the weight of the marble, as I do with a glass punty.
- When working the marble, make sure you keep the punty joint heated. If you’re heating the whole marble, there will probably be enough radiated heat from the marble to keep the punty joint secure. But, if you’re working on just a specific part of the marble, remember to heat the punty and the punty joint every minute or so. It just needs a little blast of heat every now and then. It doesn’t have to glow. If you allow the joint to cool too much, the marble will pop off because of the differences in COE between the glass and the steel. Therefore, anytime you’re going to manipulate the glass where there will be strain on the punties, such as twisting the marble, always heat the punty joints a bit before you start.
- To remove a punty I use several different techniques:
- If I’m just trying to remove a punty quickly and don’t care about the surface pattern on the marble, (i.e. it’s attached to a solid color), I heat the JOINT and pull straight out.
- If I’m trying to preserve the surface pattern, (i.e. it’s attached over some thin stripes), I heat just the PUNTY and pull ever-so-slightly out. By heating the punty rod to red hot, near but not on the joint, the heat travels down the punty to the joint and causes the punty to let go. You will end up with a slight indentation the size of the end of the punty, but the pattern won’t be disturbed. Simply heat the end of the marble and the indentation will come back out.
- If I’m trying to preserve a swirl pattern, (i.e. it’s attached to the end of a clambroth), I use the previous technique if the end is already twisted the way I want it. Otherwise, I heat the glass around the joint. Once the glass around the joint is heated I can pull out and continue the twist. I melt off the end of the twist just at the punty. I sometimes finish the twist with my tweezers because melting off the punty like this can leave a very small "Dairy Queen" whip on the end if you’re not careful.
- Anytime you remove a steel punty, put it directly into a can of water. I use a pop can with the top removed because aluminum won’t rust or break. The reason for immediately putting the punties into the can of water is that any residual glass that is stuck to the end will pop right off. Thus, the punty is
 |
Figure 8
Final Punty
|
clean every time you reach for it. I keep a towel next to my bench so that whenever I grab a punty I can just wipe it with a couple strokes on the towel and I’m ready to go. I wipe them off because I don’t like the water dripping on my work surface and it can make the punty slippery and hard to spin.
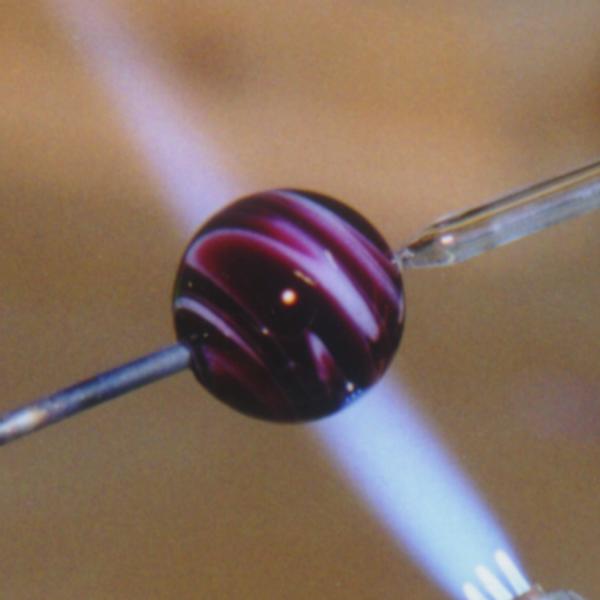
- I use the steel punties whenever I am using sheet glass, but there are certain types of manipulations that I will now only do with steel punties, even when I’m using Moretti glass. For example, I use them whenever I am doing a technique that requires me to heat the end of the marble that is attached to the punty, such as a torqued spiral or a combed pattern. The stability of the steel punties makes these techniques MUCH easier because I can work on the marble without waiting for the punties to cool. When combing (making feather patterns) the glass needs to be molten on the surface, and if I have to wait for the punty to cool, I lose some control of the pattern. Also, when making spirals or torqued spirals, I can heat the entire marble, take it out of the flame, and almost immediately begin twisting. (Figure 7 - Twisting) Whereas, with glass punties, I have to wait for a significant amount of time for the punties to cool before I can twist. Therefore, the process is not only more controllable, but faster using steel punties.
- I do not use steel punties for my final "cold" punty. When the marble is tapped off from the final punty, a steel punty tends to take a chunk out of the marble which can actually be deep enough that it is hard to melt flush! I use either a Moretti or Bullseye rod for the final punty, depending on the glass from which the marble is made. (Figure 8 - Final Punty)
- One disadvantage to using only 1/8 inch diameter punties is that they are harder for people with large hands to apply torque when doing a swirl. Spinning the marble in the flame is not difficult, but actually twisting the glass between two punties can be difficult with such small punties. To get around this problem I sometimes have to move my hands out to the ends of the punties so that they are butted into the palms of my hands. This places my fingers at a different angle and allows me to get better torque.
- A Warning: I recommend that you work standing up or with an edge guard on your work surface. This is to keep from having a hot marble drop or roll into your lap. Until you get the hang of keeping the punty joint warm, you WILL have some marbles drop off when you apply pressure to them, such as when you are rounding the marble in a mold or when you are twisting it. However, keep practicing. I believe the benefits are worth the risk! Keeping the punty joint warm actually becomes second nature very quickly and shouldn’t scare you off from trying these techniques. Once you have gotten the hang of it, they don’t drop off any more often then they do with glass punties.
Top
SPECIFIC RESULTS USING BULLSEYE GLASS
I made about fifty marbles specifically for this article using Bullseye glass, and several hundred others working out the techniques described above. About fifty of the marbles that I made out of Bullseye glass may be viewed on a web site that I set up to accompany this article: https://www.freeyellow.com/members2/tms/Abullseye1.html. Included on the site are the specific Bullseye product numbers for the glass that was used in each marble, and my comments, good and bad, about the glass that was used. As you’ll see by viewing them, most of them worked but some didn’t.
My initial interest in using Bullseye glass was to expand my palette of Moretti colors. My first few attempts using Bullseye were extremely disappointing. The learning curve was pretty steep, since I had to develop techniques to handle the glass, as well as figure out how far I could push each different color without adverse reactions such as scorching, clouding or devitrifying.
I made all of my tests with a Minor Bench Burner using oxygen and propane. The sheet glass used was all double rolled 1/8 inch or 1/16 inch thick. There was no specific reason for using the thick vs. thin other than it’s what I happened to have on hand. I also used several colored Bullseye rods, as accent colors, for which I didn’t have sheets of glass. There were two in particular that came in a 5 lb. Bullseye assortment called a "Hot Rodz Starter Pack" that I believe are only available as rods: 0013-76 Enamel White and 1140-76 Aventurine Blue.
In general, I use a fairly neutral flame with Bullseye glass. However, I find that a more oxidizing flame is helpful when I am using one or more of the colors that are susceptible to scorching.
Top
COLOR SPECIFIC NOTES
Here is a summary of my findings related to how these specific Bullseye product numbers worked in the flame, for an extended period of time, while making marbles. The ending digits in the product numbers listed below designate the type or thickness: -30 are 1/8 inch sheets; -50 are 1/16 inch sheets; and -76 are rods.
Top
0013-76 - Enamel White Rod
This is Bullseye’s only opaque white and is only available in rod form. It works well as long as you don't get it too hot. It is very prone to scorching if you're not careful. I had heard that these rods are very sensitive to thermal shock, but I haven’t experienced any problems with them.
Top
0100-30 - Black
This glass is a true black, unlike Moretti black which is actually very dark amethyst. It works very well in the flame, but it tends to spread and bleed into other colors. I tried several different color combinations to determine if it was a reaction between the black and specific colors. It does not appear to be limited to specific colors. I also tried to determine whether or not the effect was something I could control with heat or manipulation and found that I could not. Bearing that in mind, it can be a very interesting effect when used next to a light color. Now, however, when I need a black base color for a marble, I use #1114 Transparent Deep Royal Blue instead. When held up to a light it is obvious that it is not black, however, in reflected light it appears black, and it doesn’t bleed. Unfortunately, I haven’t come up with a good solution for getting thin black stripes.
Top
1101-50 - Clear and
1101-30 - Clear
This glass works well with a little more oxidizing flame. I used it in several marbles. My only complaint about this glass is that it is full of bubbles. In marbles, bubbles are not good. Therefore, when I need to encase Bullseye I use Schott clear rods instead.
Top
1101-51 - Iridized Clear
I fused this glass, covered by clear, onto some black blanks. The blanks looked gorgeous, almost like dichroic. When I twisted and manipulated the blanks, however, the iridized surfaces were stretched enough that the iridescent effect was mostly lost. This glass could be used as a surface treatment AFTER the base marble is already formed and it would probably be very pretty.
Top
0113-30 - White
This glass is designed to be translucent and therefore is a nice milky white color when used in a marble. When used as a base glass, it gives the marble an antique look. It doesn’t bleed into other colors and works well once it is hot. It must be heated slowly or it will scorch to brown in spots. A more oxidizing flame helps keep the scorching down. It can be heated extensively without scorching once it is glowing orange. It has a very nice consistency when hot, like very thick caramel.
Top
0114-50 - Cobalt Blue
This glass works well and has a nice consistency. It is a light cobalt by Moretti standards and also has the muted translucent quality of the 0113 White.
Top
0116-76 - Turquoise Blue
This glass doesn’t get the metallic scum on it that Moretti Turquoise gets. This is a very nice glass to work. It gets just a little darker and becomes more opaque as it is worked in the flame.
Top
0120-30 - Canary Yellow
This glass works well in the flame. It doesn’t tend to scorch, but occasionally gets little black flecks. They look like maybe some impurities were in the batch and burned up in the flame. They’re not numerous enough to keep me from using the glass, but they do occur. This glass tends to get lighter the longer and hotter it is worked in the flame.
Top
0124-50 - Red
This glass works well in the flame. It tends to strike toward orange the longer and hotter it is worked. Some very interesting patterns can be made by heating only certain areas for extended periods of time, thus leaving some areas red and some more orange. If stringers are pulled from this glass and used to stripe a marble, they have to be applied and the marble finished quickly or the stripes end up reddish-orange. When used with #0334 Gold Purple, the two bleed together slightly, leaving a very dark purple line between the two colors.
Top
0125-50 - Orange
This glass is a very nice color. It is more opaque than Moretti orange. It works well in the flame for a while but tends to develop tiny surface imperfections that look like the beginnings of devitrification if it is worked too long.
Top
0126-50 - Spring Green
This is a beautiful color. After fusing or working in the flame it looks almost fluorescent. It works very well but tends to get more yellow the longer and hotter it is worked.
Top
0136-50 - Deco Gray
A very nice mouse gray. It works well in the flame. It has a muted tone when used in marbles because it is developed to be translucent.
Top
0146-30 - Steel Blue
This glass developed a metallic surface scum in all types of flame. It was worst in a reducing flame but couldn't be avoided even with an oxidizing flame. I don't recommend this glass to be worked directly in the flame. Pre-fuse it between sheets of clear first if you are determined to use it.
Top
0203-30 - Woodland Brown
A very nice, rich chocolate color, this glass is made to be translucent, so a wide range of shades can be made depending on what glass it is placed over. Shades range from light brown to almost black. This glass works very well in the flame.
Top
0301-30 - Pink
This glass is extremely susceptible to scorching. It seems a little more stiff to work than most Bullseye colors, which probably contributes to the tendency to scorch it - applying too much heat trying to get it to work better. The scorching happens mostly on the edges when building up the initial gather in the flame, or when melting in stripes made from stringers of this glass. Scorching in this glass typically shows up as browned or discolored patches.
Top
0305-30 - Salmon Pink
This glass works well. It will also surprise you if you don’t know what you’ve got. It starts out Peach and strikes to a very nice Salmon Pink in the flame. There is no standard Moretti color to compare to this.
Top
0334-50 - Gold Purple
This is a great true-purple color that is not available in Moretti. It starts out a "federal blue" color and strikes to purple in the flame. It’s an easy glass to work and didn’t present any problems in the flame. When used with #0124 Red, the two do bleed together slightly, leaving a very dark purple line between the two colors.
Top1114-30 - Transparent Deep Royal Blue
This glass works extremely well and does not get cloudy in the flame, even when worked for a long time. I use it as a replacement for #0100 Black when I need a dark base color for a marble. It is extremely dark and doesn’t bleed like the Black does.
Top
1116-50 - Transparent Turquoise Blue
This is nice glass to work. It doesn't get cloudy, even when worked in the flame for a long time. It’s a little stiffer than Moretti and takes a little more heat to smooth the surface.
Top
1120-30 - Transparent Canary Yellow and
1125-30 - Transparent Orange
Both of these glasses are gorgeous colors and they both work very well! They don’t get cloudy when fused into blanks. However, when worked directly in the flame, they both cloud up after just a short time, and get more cloudy the longer and hotter they are worked. They can be encased in clear to keep them from clouding, which works well and doesn’t detract from their color at all. They both contain a few bubbles, but the bubbles aren’t intolerable.
Top
1112-30 - Aventurine Green
This glass turns out much brighter on a marble than it looks in a sheet or rod, especially if it is used over #0113 White or #0120 Canary Yellow. It tends to bleed its transparent green base glass into the surrounding color and will tint White a very pale green, and Canary Yellow almost avocado. The longer and hotter it is worked in the flame, the more it spreads. In that respect it is reasonably controllable. Stringers of this glass must be very thin to end up with thin lines on the marble.
Top
1137-76 - Transparent Medium Amber
A very nice dark yellow when used over White. It works well without getting cloudy in the flame.
Top
1140-76 - Aventurine Blue
This is a very dark Blue Aventurine. It can even be used as a Black Aventurine on dark background glass. It tends to bleed its transparent blue base glass into the surrounding color and will tint White a very pale blue, and Canary Yellow almost chartreuse. The longer and hotter it is worked in the flame, the more it spreads. In that respect it is reasonably controllable. Stringers of this glass must be very thin to end up with thin lines on the marble.
Top
1311-30 - Transparent Cranberry Pink
This glass works very well in the flame, does not get cloudy, and does not bleed into other colors. It is a gorgeous dark cranberry color when applied over white, but is extremely dark when made into a base marble and can be used as a substitute for Black.
Top
1408-76 - Transparent Light Aqua Blue
This glass is pretty and works well without getting cloudy in the flame.
Top
1411-30 - Transparent Light Pink
This glass is very pretty and doesn’t get cloudy, but it must be treated delicately. It tends to scorch if it gets too hot, leaving little black strings through the pink. This happens mostly on the edges when building up the initial gather in the torch, or when melting in stripes made from stringers of this glass. A cooler, more oxidizing flame helps keep this glass from scorching. This is actually a very nice pink to work with compared to Moretti Gold Pink, because it keeps its shape and doesn’t bleed into surrounding colors. In fact, it seems a little more stiff in the flame than other Bullseye colors and is harder to get melted smoothly. When used as a base glass for a marble it appears black, but appears a gorgeous deep wine color when held up to a light.
Top
1417-30 - Transparent Emerald Green
This is very nice glass to work. It doesn't get cloudy, even when worked in the flame for a long time
Top
1437-50 - Transparent Light Amber
This glass is very nice to work and does not turn cloudy. When I fuse this glass, the cube loses all shape, but the glass doesn’t feel any softer in the flame than any other Bullseye glass. The only negative about this glass is that it is riddled with bubbles!
Top
1442-50 - Transparent Neo-Lavender
This glass is GORGEOUS! It changes color depending on the type of lighting and what it is resting on. A fused blank of this glass looks Lavender resting on a dark or white surface. However, held in the hand, the reflected color of your hand turns the entire blank pink. I tried putting pink stripes on a base marble of this color to see if I could get a permanent shift to pink. The results were wonderful. The resulting marble is Fuchsia! This glass works very well and doesn't get cloudy. The only negative is that it is riddled with bubbles - but it's so pretty, who cares!
Top
ABOUT THE AUTHOR
Drew Fritts has been working with hot glass for almost four years. His web site has a Gallery of over 100 of his contemporary art glass marbles for sale, some of which are limited edition sets. It will soon have his fused works as well.
T & M Specialties
3875 E. Kingsbury
Springfield, MO 65809
(417) 886-0325
Email: tms@surfnthe.net
Web Site: https://www.freeyellow.com/members2/tms
Copyright © 1999 by Drew Fritts - All Rights Reserved
Top
- Back to Vol. 12, No. 5.
Index (SAMPLES)
Last Modified:
08 AM on Thursday - December 19, 2019