Glass Line
June/July, 1996. Vol.10 No.1

<ONLINE EDITION>


Antique Glass: Methods and Techniques
The Art of Pressed Glass

by Lisa Madsen


Glass working goes back to the dim regions of antiquity, however, did you know that Jamestown, the first American settlement, created a glass producing industry?


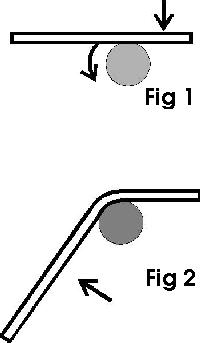
In the late eighteenth century, English and Dutch glass houses were producing the first versions of pressed glass on a modest scale. As each piece had to be individually crafted its time consuming 
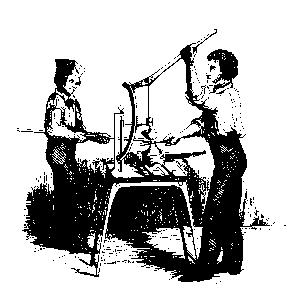
nature kept early ventures small. The drawing above illustrates the machinery used to create these early pressed pieces. Other methods involved using a hand held iron tool quite similar to the waffle iron to create small pieces such as the feet, or bases to be attached to larger free hand, or mold created objects. It was also a source of producing flattened round disc, or wheel form stoppers for bottles and fancy furniture knobs which were widely used during the period.

As shown, these early apparatuses were operated by two persons. The first had to take the molten glass on its punty rod to the machine, where his partner would snip off the necessary piece with shears letting it drop into the waiting mold fitted on the machine. They would then immediately bring down the long lever handle closing the mold and pressing the glass into shape.

Common hazards with this method stemmed, quite understandably, from the operators gauging of the amount of material to insert in the mold, and the resulting uneven distribution. There was the danger of the glass cooling too quickly and cracking before it could be carried to the annealing oven. Or the plunger half of the two part mold could come down slightly off-center and produce a crooked, or unfilled piece.

An early discovery in the burgeoning expansion of this glass form involved the problems inherent in the materials commonly available, soda based glass. The heated soda glass was not pliable enough when pressed into the mold. The glass houses then resorted to the more costly lead based glass mixture known as flint glass (due to its early composition containing ground flint). The lead formula was a more satisfactory material that, while being heavy, was also more pliable and a more easily controlled substance in the mold environment.

The majority of early pressed glass was small in size due the restrictive nature of the molds available as well as the type of pressing mechanism(s) used. The typical early pieces were simple items such as the aforementioned furniture knobs, small or flat tableware, plates, bowls and compotes. Dips were common bowls used for just that purpose, generally salt dipping (salt during that time not being refined as we know it today and subject to clumping and hardening).

These initial pressing molds were generally carved on the molds plunger half, with the design being molded into the bottom of the piece, leaving the interior smooth. Advancement arrived in the period around the 1830's with the addition of the cap ring, a ring of metal that fit around the mold plunger with it's carved design. With this augmentation the mold could be closed with the ring helping control the glass distribution around the edge of the mold. The cap ring also helped keep the decorative edging more uniform, creating a more pleasing look.

As the art form evolved and more elaborate work emerged, as expected, larger offerings were attempted despite the natural difficulties. This resulted in combination style pieces, the most common and prevalent example being candlesticks and lamps. Unusual pieces such as covered compotes were created by joining two pressed pieces together with a molten wafer while both sections were hot.

The bulk of pressed glass lamp pieces involved marriages between the pressed portion and the molded piece as outlined. However, another method of conjoining the components involved joining the pressed glass piece with a hollow metal pedestal, or marble column. Surprisingly enough, plaster of Paris was commonly used to secure the pieces together, along with a metal rod running up through the center and a metal cap ring securing the joint. So use caution with those old lamps that you don't dissolve your plaster of Paris when cleaning!

During the mid 19th century, the offerings in the pressed glass marketplace increased to include many newer designs such as cake stands, intricate serving plates and platters, bread plates, pickle dishes, rose bowls and biscuit jars being introduced on a wider scale.

The shapes of objects continued to mature in context with the ever-increasing refinement of the pressing process, as well as the competitive nature of the glass market. American glass was an imminently saleable commodity during this period and its potential profit inspired many glass factories to emerge and join in the development and expansion of the existing trade. Pitchers for example, often had applied glass handles with a curlicue end. Instead, plain rounded bands of glass were being attached to the rim near the top and bottom. These handles were heavier near the bottom than near the rim where they tapered gradually. This innovention leant a completely new look to the pieces produced.

Late Victorian pressed patterns often had pieces raised on a short pedestal, or short legs and feet at each corner of the base. Putting legs, or little feet became quite popular and were incorporated further into the increasingly ornate patterns with knobs and bands to match the feet throughout the entire design.

Around this time the introduction of non lead, soda lime formulated glass meant that glass goods could be produced much more cheaply. Soda lime glass was easier still to mold into the popular detailed designs, and the charm of these elaborate patterns helped to mask the reduced brilliance of the glass itself.

Another milestone during this general period was the development and subsequent popularity of patterns in the tableware being produced. Prior to this, pressed glass had been created in an unmatched manner, on an individual basis and level. Patterns became a success however, and the resulting growth spurred increased production and innovations. For example, the Ribbon pattern was created by alternating narrow bars of frosted and clear glass. Interestingly enough, the frosting of the bars was achieved by machine grinding rather than the more common method of acid fumes, showing the affect of increased production methods being incorporated to meet these increasing demands. Another antique design featuring the frosted look was produced by the Gillinder and Sons glass firm in Philadelphia, Pennsylvania. This line incorporated the frosted stem with a prominent recurring subject (i.e. three lion faces) in conjunction with the usual top portion, capped with the recurrent subject as a prominent finial.

The natural offshoot of creativity in pressed glass involves coloration. In accordance with the popularity and wide spread beliefs and myths of the 17th century, glass makers devoted much time researching the formula for ruby glass as it was believed that drinking from such glass would give protection from all manner of ills, rather charming in retrospect. Colorations available to these early glass workers and factories were normally produced using the metallic oxides. In small amount, manganese helped produce good, clear glass while a higher concentration led to a light purple color. Cobalt, or copper predicably resulted in varying shades of blue. Uranium (in its pre-radioactive era!) gave a yellow-green hue, later referred to as Vaseline'. Gold and copper were necessary to produce the highly prized red. In a reversal from today's standards and popularity, clear glass was considered the most desirable and also was the rarest.

Antique glass makers normally marked their pieces with initials, ofttimes cleverly concealing them in the pattern. That, along with the definitive marks of the shear and annealing cracks, help date old glass pieces. Pressed glass of the 19th century is reproduced on a wide scale today. Its offspring, Carnival and Depression glass are also showing the enduring nature of these popular glass forms. They are one of the few items that retain their value and interest due to irregularity and minor imperfections.

Pressed glass was a marvelous innovation. As decoration it was invaluable, as main focus it was and remains, enchanting. Just as todays artisans continue with the combination of mediums to achieve their unique forms of artistic expression, so too did these early glass artisans marry form and decoration into a lasting combination of beauty and function.


The Queens Collection: Danish Royal Glass

A Special Exhibition
The Corning Museum of Glass
Corning, New York
June 8 - October 20, 1996


About 200 glasses from the collections of the Danish royal family, now housed in Christiansborg Palace and Rosenborg Castle in Copenhagen, will be on display in the 1996 special exhibition of The Corning Museum of Glass. This exhibition has already been presented in Copenhagen, Jutland, and Oslo. Its only American showing will be in Corning.

The Danish holdings form one of Europe's most important collections of table glasses, glass services and art glass. These works include glasses that have added to the splendor of royal tables, magnificent goblets that were engraved to commemorate important events, and objects that were fashioned as gifts to persons close to the royal family.

The total stock of glass at court was quite extensive, but much of it has been lost through breakage, devastating fires at royal palaces, and changes in drinking habits. (It was once customary for glasses to be broken after the drinking of a toast. For this reason, not one glass remains of the 35,000 that were ordered from the royal glasshouses for the coronation of Christian IV in 1596.) Nevertheless, more than 500 pieces have been preserved.

During the last three centuries, several Danish monarchs were enthusiastic glass collectors, but the royal glass house has been kept in various locations, and this exhibition marks the first time it has been presented together.

The Corning show will feature 17th- and 18th- century Bohemian and German glasses, a wonderful group of Venetian glasses that was a gift to Frederick IV from the Venetian Senate in 1708-1709, and some glasses from the Nostetangen factory in Norway, which was founded under the patronage of Frederick V, king of Denmark and Norway, in 1741.

One treasure that was found as a result of organizing this exhibition is a group of 18 glasses designed by Emile Galle, who was one of France's leading figures in the decorative arts at the end of the 19th century. These glasses, which were presented to King Frederick VIII and Queen Louise when they visited Paris in 1907, will also be on display in Corning.

An illustrated catalog in Danish and English will accompany the exhibition "The Queens Collection: Danish Royal Glass." Published by Christiansborg Palace in Copenhagen, Kongelige Glass/Royal Glass presents a detailed discussion of the four centuries of table glass, glass services, and goblets that are featured in the exhibition. This 397 page book contains 24 color illustrations (including all 18 of the Galle objects) and more than 160 black and white illustrations. It may be ordered from The Corning Museum of Glass, Sales Dept., (607) 937-5371.


The Corning Museum of Glass
Announces New Glassmaking Studio


The Corning Museum of Glass is expanding its education programs and its role as an advocate for glass art by opening a hot-glass studio in May. "The Studio," will present glassmaking workshops, classes, and demonstrations in both the art and craft of glassmaking.

Led by Amy Schwartz, head of The Studio, with internationally known glassblower William Gudenrath as resident adviser, The Studio promises new excitement for visitors to the Corning Museum of Glass.

"We will make glassworking available to fit any level of experience," said Ms. Schwartz. "We'll offer programs for first-timers, children, scientists, artists, and hobbyists. We have a wonderful opening session lined up with world-renowned and gifted instructors and a variety of sessions and topics."

The Studio's grand opening is planned for Memorial Day weekend. The summer session, beginning May 27 and concluding in August, features one- and two-week intensive courses on glassblowing and lampworking. The instructors include William Gudenrath, Lino Tagliapietra, Susan Plum, Sally Prasch, Paul Stankard, and Gianni Toso. Programs will also be offered in fall, winter and spring.

College credit is available for certain classes. Mr. Gudenrath, who will teach and demonstrate at The Studio, said, "Students can learn glassworking skills, then spend time examining the Museum's collection . They can study an object made by an instructor, or by some ancient glassworker who once struggled to master the very same skills."

While the focus of the first summer will be on glassblowing and flameworking, later sessions will feature other glassworking techniques such as mold making, casting, engraving, scientific lampworking, and enameling.

Future developments will include Elderhostels and artist-in-residence programs.

The Studio is committed to making glassworking as widely available as possible. Tourists and othe visitors will be able to try hot glassworking and glassblowers will be able to rent time to create their work.

For further information, or a workshop brochure, call The Studio at The Corning Museum of Glass at (607) 974-6467.


Glass Line is now Entering our
10th year of publication
We gladly accept all submittals for publication; articles, reviews, interviews, photographs, humerous anecdotes, general opinions, ETCETERA.

The bottom line is we welcome ALL input from our subscribers. The original focus and goal of Glass Line was to provide a link between the average glass worker on all levels to each other and sources of all kinds.


THE BEAD COLUMN

By The Venerable Beadle


"Why" Beads?


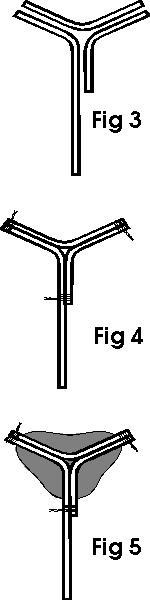
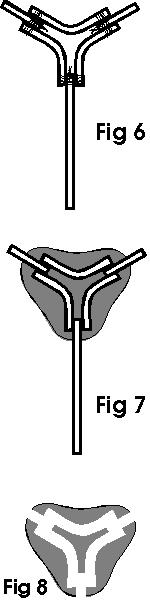
Get a load of this quotation from the Spring 1996 issue of a magazine(1) "for progressive retailers": "The biggest fashion trend to hit the jewelry scene in a while is the 'Y' necklace. This item is most often crafted from beads.....with spaces between them and a drop of one or two [beads] or a gemstone hanging from the center to form a 'Y'." And there is more about "the all-important 'Y'". In addition to reiterating the opinions just expressed, the magazine gives a list of a baker's dozen "of the most popular" "techniques and styles in the news" and gives the fourth place in the list to the 'Y' necklace. Also, NICHE quotes Hedda Schupak, fashion editor of Jewelers' Circular-Keystone magazine as follows: "There's no reason not to translate the look you love into something that sells on a commercial level. For instance, if you're into the rough gem look, you can still do the 'Y' neck with your favorite stones and a rough hewn chain."

After having read such a pitch for "casual, trend-forward 'Y' necklaces" The Venerable Beadle couldn't resist making some 'Y' beads and this column tells how he made these beads by using an expendable, shaped mandrel formed from copper tubing. Previous Bead Columns have mentioned the use of telescoping brass tubing which is available in most hardware stores and nearly all craft-supply shops. The same company which supplies the brass tubing also makes telescoping tubing of copper. It is available almost as readily as the brass tubing. Select a size whose outer diameter corresponds to the desired inside diameter of the string hole of the finished bead. The Beadle has used tubing with outer diameters of 5/64 and 7/64 in. Except for the special case which will be discussed later the tubing needs no preparation before use.

Place the end of the tube against a firm solid rod clamped in a bench vise and make a 120 deg. bend at one end. Cut off the bend portion of the tube. These operations are illustrated in Figs. 1 and 2. Repeat this operation so as to make two similar bends. Repeat a third time except make one arm of the bent tube at least two inches longer than the others in order to serve later as a handle as shown in Fig 3.

If the diameter of the forming mandrel is too small the walls of the tubing will tend to become pinched. A little pinching won't matter as long as the space inside of the bend is large enough to pass the bead string. There are special tools for bending tubing without pinching but The Beadle doesn't have one. He uses a length of spring (expansion type as compared to compression type) whose inner diameter just permits the passage of the tubing. He then bends the two of them around the forming mandrel. The tubing can be removed after bending by twisting in the direction that the spring was wound.

The copper tubing can be cut with a jeweler's saw or by filing completely around the circumference of the tube with a triangular file and snapping it apart as if it were a piece of glass tubing.

Now assemble the three bends into an array as shown in Fig. 4 and fasten them together using bare copper wire of about 26 gauge. This can be done by wrapping several turns around each pair of bends and twisting the ends of the wires. Make certain that the tubes are all coplanar and that the wires are tight enough to hold the entire assembly rigidly. Insert the long end of the bend last made into a pin vise which will serve as a handle during the fabrication of the bead. Since the purpose of the handle is to keep one's hands from getting burnt don't insert any more of the bend than is necessary to hold it securely. You are now ready to start making the 'Y' bead.

All of The Beadle's 'Y' beads have been made using Moretti but he has no doubt about any glass being usable with the possible exception of Pyrex. In any case, do not use bead release! Also, do not succumb to the temptation of starting the application of the glass at the part of the bead nearest the handle. It will be easier if you do that part last. Get the copper hot enough so that it is nearly incandescent before starting to add the glass from a partially molten rod. It is not necessary to cover every bit of the inside of the copper assembly with glass. However, if you do so it will make threading of the finished bead easier. Because no bead release is used the interior holes will be clean and can be used as a design element if transparent colors are used for the core. After completely covering the copper assembly with glass re-heat those portions of the bead which appear to have excess glass and allow gravity to redistribute the excess. At the same time you will be able to find and correct those places which do not have enough glass and need some more. A narrow graphite marver will be found helpful in this stage of the operation. The bead core at this stage is shown in Fig. 5. When you think that the bead core is finished fire polish it completely. Now decorate the bead according to your desires. When this operation is finished allow the bead to cool just enough to become stiff and loosen the pin vise. Use a pair of pliers because it will be hot. Remove the pin vise and place the bead in an annealing oven set at the annealing temperature.

After the bead has been annealed place it in a solution made by mixing equal volumes of concentrated nitric acid and water. Use extreme caution and do this operation out of doors because of the toxic vapors. In a few minutes all of the copper will have been dissolved leaving the finished bead with immaculate string holes. If the bends were badly pinched it will take somewhat longer to remove all of the copper.

You may be able to improve the surface finish of the inside of the string holes if this is important to your design. Try polishing the copper tubing before you bend it. Just be certain to clean the tubing with a strong detergent and a stiff brush in order to remove the last traces of polishing compound before heating the tubing.

When the 'Y' bead is made according to the instructions given above the result will be a bead with two string holes at each end.(2) If it is desired to make a 'Y' bead with only one string hole at each end proceed as follows. Make three nearly identical bends similar to the first two described above and illustrated in Figs. 1 and 2. Cut off the excess tubing leaving only about « in. of unbent tubing. Prepare two pieces of straight tubing about 1 in. long and one piece about 3 or 4 in. long. Assemble these four pieces with bare copper wire as before but be careful to bring the twisted ends toward the center of the assembly and parallel to the straight pieces of tubing. Clip off as much of the excess wire as you can without weakening the assembly. This is shown in Fig. 6. Now proceed as before except that be sure to cover completely the ends of the bends with molten glass as shown in Fig 7. The removal of the copper by the nitric acid will be somewhat slower than before because the acid will not be able to start dissolving the bends until the straight pieces have been dissolved. A 'Y' bead made in this way will be somewhat more difficult to thread than one made by the first method because of the convoluted shape of the interior channels as shown in Fig 8.

This same technique can be used to make a bead with four (or more!) openings for the bead strings instead of three. For example, to make a bead with four openings make four bends as before except bend the tubing to an angle of 90 deg. each time. As before, one can have a single string hole at each opening instead of two by adding an extra piece of tubing at each of the vertices as described in the previous paragraph.

Footnotes


(1) C. Edelstein, NICHE, 8[2],p48, Spring 1996.
(2) The Venerable Beadle, Glass Line, 9[6],p11, April/May, 1996.

Captions For Figures


1. Hold the short end and bend the long end partly around the forming mandrel which is clamped in a vise.
2. Cut off beyond the bend.
3. Three bends ready for assembly. The long piece will serve as a handle.
4. The assembly is held together with bare copper wire.
5. Cross-section of assembly after covering with glass.
6. An assembly used to make a 'Y' bead with only one string hole at each vertex.
7. Cross section of bead made with the assembly of Fig. 6.
8. Cross-section of above after dissolving the copper. For the sake of clarty the copper wire seen in figure 6 has been omitted from fig 7.

Notes (added - 07/16/2002)
Read your sample newsletter. In the "WHY" beads column the suggestion is to use diluted acid to etch out the copper tubes. A slower but less toxic method is to use ferric chloride solution. This is sold in electronics outlets as printed circuit board copper enchant. This product is slower but much safer than acid.
by Rob Wilman


VIDEO REVIEW
By Murray Bloom


THE BASICS OF MAKING MARBLES
By Gerry Coleman
Killer Beads
4501 Palmyra N.W.
Albuquerque, New Mexico 87114
This new video is no more and no less than what the title states: the basics. It is an excellent place for a novice to start. The disclaimer before the first titles in the video states that "[it is] intended for people with lampworking experience". Thus, Gerry Coleman must have felt that it was not necessary to include anything about safety, not even a mention of the use of didymium glasses. However, the viewer will see him remove his ordinary spectacles and put on a different pair, without comment, just prior to beginning the first demonstration on the video.

The video consists of the fabrication of three marbles in their entirety, in real time, plus two others which are seen first after the initial gathers have been completed. Moretti glass and a Minor burner are used throughout. Judging from the designs he uses in this video, Gerry, who is the president of the New Mexico Marble Association, seems to have a special interest in making reproductions of early American factory-produced marbles. The sequence showing the construction of a "paper weight marble" could just as easily serve as an introduction to the making of completely lampworked paper weights. Missing, however, is any instruction on murrine-making.

The photography is excellent with frequent and functional changes in camera angle, thanks to the use of at least two video cameras and operators. The narration, which Coleman recorded while being photographed, is sparse and contains a few less-than-explanatory comments. For example the statement "I'm heating the rod at a 45 degree angle" occurs at least twice. Angle to what? It is not obvious that a 45 degree angle to the vertical was meant.

He shows a nice trick for taking off the residual (Pyrex) pontil if, instead of coming apart at the join when tapped, it breaks about a quarter of an inch away: grip the stub with a tweezers and tap the tweezers. He uses wet wooden marble formers instead of formers made of graphite because they give a better surface finish to the Moretti glass. (Besides, the writer thinks, they look a heck of a lot cuter with their little wooden handles!)

Coleman seems to have a peculiar idea as to what constitutes annealing: a long soak at the annealing temperature followed by twenty minutes at the same temperature. It may work for him with his lehr but it is poor advice to give to a beginner. What also works for him is to fuse dichroic glass strips to the marble under construction with the coated side up followed by casing the coated side with colorless glass in order to protect it from flame damage during further processing. For the writer it is easier to fuse the dichroic glass coated side down without letting the flame impinge on the coating and skip the casing entirely. In addition to being less work this has the advantage of being less likely to incorporate air and create air bubbles. (Of course some people, such as The Venerable Beadle, claim to like air bubbles.

There is a good demonstration of raking, which appears to be easier on a marble, with its large mass, than on a bead. Missing from the narration is any explanation as to why Gerry consistently starts heating the marble at the end at which the raking stroke will terminate. (Probable answer: so that it doesn't take as long for the glass to come up to the correct temperature while heating just ahead of the tool when doing the actual raking.)

The video concludes with a brief and unclassified list of suppliers. Now, if someone would persuade the Hulet sisters to make a video on marbles we'd have the logical complement to Gerry Coleman's.


AND NOW FOR
SOMETHING DIFFERENT!


by Ian Pearson
Thurso Glass Studio
Caithness, Scotland
I, like a lot of glassblowers I suspect get asked to produce some strange items at times. One such request was from an art student who specified a full size glass brain! Now I can make anything provided I have a picture or drawing to follow. Having a friend who is a biology teacher came in very useful. The conversation went something like this, "Hi, Robert, do you have a brain?"

I am well known for asking people for strange items so this came as no surprise to my friend.

"Sorry Ian, we had a brain at the school last year but threw it out because no one used it!"

Sometimes it is true that art does truly reflect life. I made the brain following a biology textbook and the customer was suitabl impressed, unfortunately two more were required, to be used as an egg timer. A 3 foot high metal frame was built to suspend the brains but by this time the student had run out of money. The project was never completed and I am just waiting for the next biological request.


Jewell in her Tummy

I didnt have to wait long if belly buttons count as being in this category, for a young girl came to me to put a jewell in her tummy button as she was going to be dressed up as a belly dancer for an all girls night out before her wedding. Not many people know that the average belly button is about 30 mm wide, (go on measure your own one now, be warned the callipers can be sharp). I made several different shapes and sizes out of ruby glass and tested their fitting on myself. The look of shock on one of my customers face as they came into the studio and saw me trying to lodge a piece of glass in my stomach will remain with me for a long time. I explained that this is an old glassblowers tradition to test if the glass is strong and smooth, luckily this story was believed and all I can say we must be a pretty strange group of people for this activity to be accepted without question. Finally after weeks of trials the time came for the customer to have it fitted, this I must point out she did herself and in an evening full of fast and sudden movements the glass never fell out. As a final good will gesture the belly dancing raised over £60 ($120. dollars) for a local charity by people paying to kiss the glass 'in situ'!!!!!!!!!!!


Last Modified: Thursday, 19-Dec-2019 09:24:53 MST